A network printer, connected to the router by cable or Wi-Fi, can be used by every computer in the office without relying on one PC being on. The most reliable way to install it is by IP address; automatic discovery works, but often causes the dreaded “printer offline” when the IP changes.
In this article
Before you start
- The printer must be on and connected to the same network as the computers.
- Find the printer’s IP address: most models print a network configuration page from the control panel menu. You can also check the router’s device list.
- Have the exact model handy in case you need the manufacturer’s driver.
Step 1: test communication with the printer
In PowerShell, replace the IP with your printer’s:
ping 192.168.0.50
Test-NetConnection -ComputerName 192.168.0.50 -Port 9100Step 2: add the printer by IP address
- Open Settings › Bluetooth & devices › Printers & scanners.
- Click Add device and wait a few seconds.
- Click Add manually (or “The printer that I want isn’t listed”).
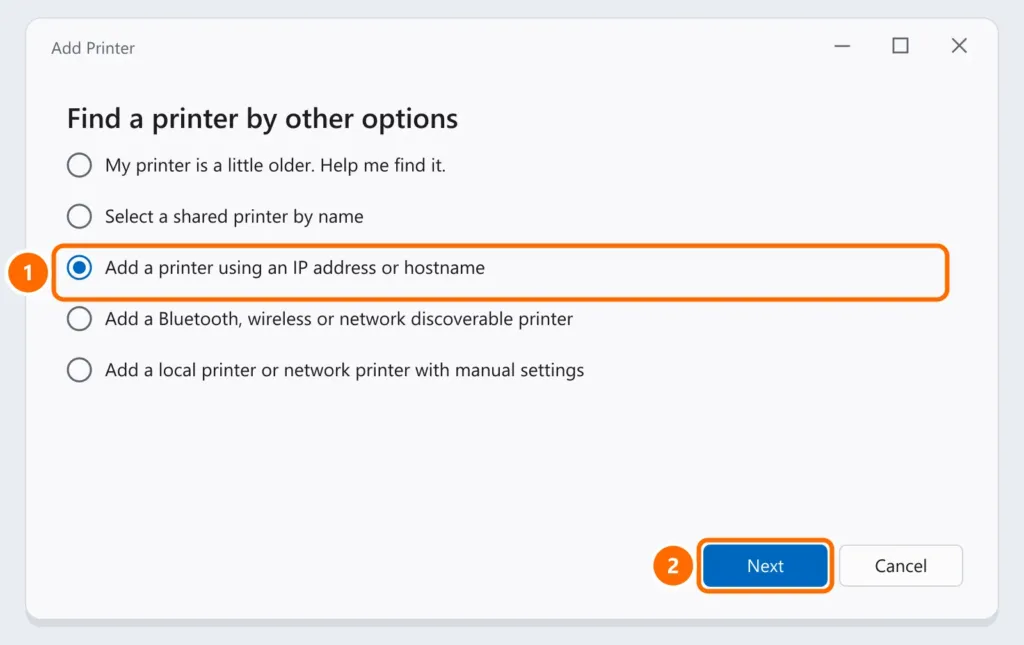
- Choose Add a printer using an IP address or hostname and click Next.
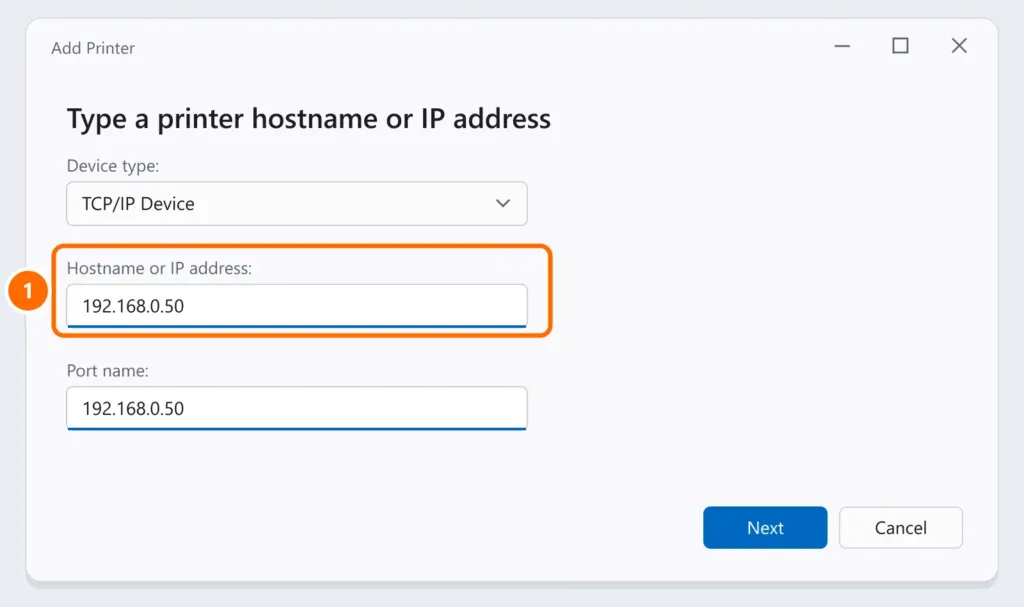
- Under Device type, leave TCP/IP Device, enter the printer’s IP and continue.
- Select the driver: Windows usually offers the manufacturer’s driver or a compatible generic one. If your model isn’t listed, click Have Disk and use the driver downloaded from the manufacturer’s website.
- Give it an easy name (for example, “Front Desk Printer”) and print a test page.
Option: automatic discovery
Under Printers & scanners › Add device, the printer often shows up on its own. It’s the fastest method, but some automatic connections use the WSD protocol, which can lose the printer when its IP changes. If that happens, remove it and add it again by IP (step 2).
Option: a printer shared from another PC
If the printer is USB and attached to a computer that shares it, type the share path in File Explorer, such as \\PC-NAME, right-click the printer and choose Connect. The sharing computer has to stay on.
Installing with PowerShell (multiple machines)
To standardize the installation across several computers, with the driver already installed:
Get-PrinterDriver | Select-Object Name
Add-PrinterPort -Name "IP_192.168.0.50" -PrinterHostAddress "192.168.0.50"
Add-Printer -Name "Front Desk Printer" -DriverName "DRIVER NAME" -PortName "IP_192.168.0.50"
Replace DRIVER NAME with the exact name shown by the first command.
Common problems
Stop-Service Spooler -Force
Remove-Item "$env:SystemRoot\System32\spool\PRINTERS\*" -Force
Start-Service SpoolerFAQ
How do I find the printer’s IP address?
From the printer’s control panel (network menu or printed configuration page), the manufacturer’s app, or the list of connected devices in your router’s admin page.
Is a Wi-Fi printer worse than a wired one?
For printing, the speed difference is small. Cable is more stable; on Wi-Fi, keep the printer near the router and give it a reserved IP.
Do I need the manufacturer’s driver?
Not always. The generic Windows driver works with most current printers. Install the manufacturer’s driver if you need specific features or your model isn’t recognized.