If your company’s email lands in spam, or someone has received a fake message “sent” from your domain, the cause is almost always three missing DNS records: SPF, DKIM and DMARC. They prove to mailbox providers (Gmail, Outlook, Yahoo and others) that a message really came from a server you authorized.
Since 2024, Gmail and Yahoo require authentication from every sender, and bulk senders need all three records. In practice, they are now mandatory for any business that relies on email.
In this article
What each record does
| Record | What it checks | Where it lives in DNS |
|---|---|---|
| SPF | Which servers may send email for your domain | TXT at the domain root |
| DKIM | Whether the message was signed by your domain and not altered | TXT or CNAME at selector._domainkey |
| DMARC | What to do when SPF and DKIM fail, and where to send reports | TXT at _dmarc |
Before you start
- Access to the dashboard where your domain’s DNS is managed (Cloudflare, your registrar, Hostinger, GoDaddy, etc.).
- A list of every service that sends email on behalf of your domain: mailbox provider, invoicing system, CRM, email marketing tool, website.
Step 1: set up SPF
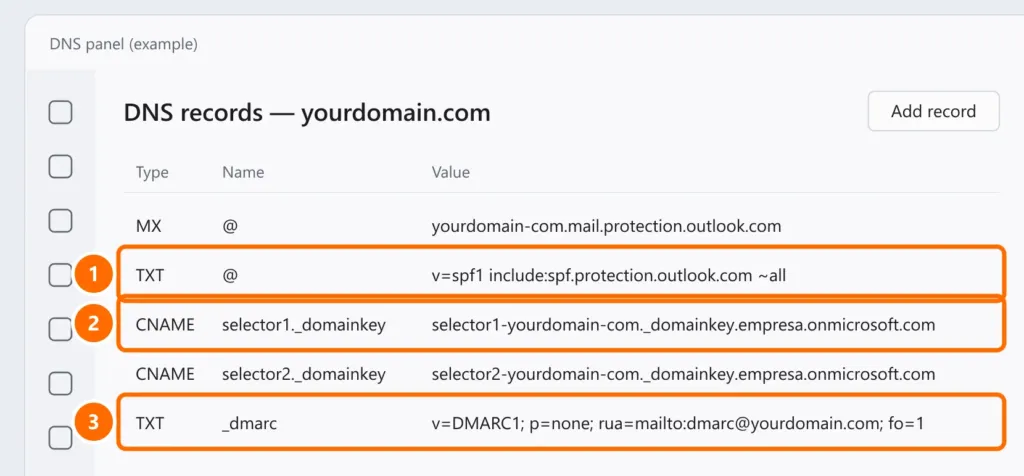
SPF is a single TXT record at the domain root that lists who is allowed to send. Use your provider’s include:
| Provider | SPF snippet |
|---|---|
| Google Workspace | include:_spf.google.com |
| Microsoft 365 | include:spf.protection.outlook.com |
| Hostinger | include:_spf.mail.hostinger.com |
Example for a company using Microsoft 365 plus an email marketing service:
v=spf1 include:spf.protection.outlook.com include:marketing-service.com ~all- In your DNS dashboard, create (or edit) a TXT record with host
@(root) and the value above, adapted to your services. - End it with
~all(soft fail) while testing. Once everything checks out, you can switch to-all(hard fail).
Step 2: turn on DKIM
DKIM is generated by your email provider, which creates a key pair and tells you which record to publish.
- Google Workspace: in the Admin console, go to Apps › Google Workspace › Gmail › Authenticate email, generate a 2048-bit key and publish the
google._domainkeyTXT record shown. Then come back and click Start authentication. - Microsoft 365: in the Microsoft Defender portal, open the email authentication settings (DKIM section), select your domain and publish the two CNAME records shown (
selector1._domainkeyandselector2._domainkey). Then enable signing. - Hostinger: in hPanel, the email settings for your domain show the authentication records (including DKIM) for you to copy. If your DNS is hosted at Hostinger, they are usually created automatically.
Repeat for every service that sends as your domain (email marketing, CRM): each one provides its own DKIM record.
Step 3: publish DMARC
Create a TXT record with host _dmarc. Start in monitoring mode:
v=DMARC1; p=none; rua=mailto:dmarc@yourdomain.com; fo=1p=none: blocks nothing, only generates reports.rua=: the address that will receive daily reports from mailbox providers.
Watch the reports for a few weeks. Once every legitimate service shows SPF or DKIM passing, tighten the policy gradually:
p=quarantine; pct=25— sends 25% of unauthenticated messages to spam.p=quarantine— applies to all of them.p=reject— rejects spoofed messages. This is full protection against domain spoofing.
Step 4: verify your setup
After publishing, wait a few minutes (some DNS providers take a few hours) and check from a terminal:
nslookup -type=txt yourdomain.com
nslookup -type=txt _dmarc.yourdomain.com
nslookup -type=txt google._domainkey.yourdomain.com
Then send an email to a Gmail account, open it and click ⋮ › Show original.
Common errors
FAQ
Do I need all three records, or just SPF?
All three. SPF alone doesn’t protect the visible “From” address and doesn’t survive forwarding. DKIM signs the message, and DMARC tells providers what to do when something fails.
Can I start with p=reject?
It’s not recommended. Start with p=none, use the reports to find every service sending on your behalf, and only then move to quarantine and reject. Skipping steps can block legitimate email such as invoices.
Everything is set up but my email still goes to spam. Now what?
Authentication is a prerequisite, not a guarantee. Domain and IP reputation, message content, complaint rates and outdated contact lists also affect delivery.