Sharing a folder on the network lets other computers at the office or at home open and save files in it, without USB drives or the cloud. It works on Windows 11 Home and Pro. The sharing computer must be on for others to reach it.
In this article
Step 1: prepare the network
On the sharing computer (and the ones that will access it), the network should be private, with Network discovery and File and printer sharing turned on. The walkthrough is in how to fix error 0x80070035 (step 2).
Step 2: share the folder
- Right-click the folder › Properties › Sharing tab.
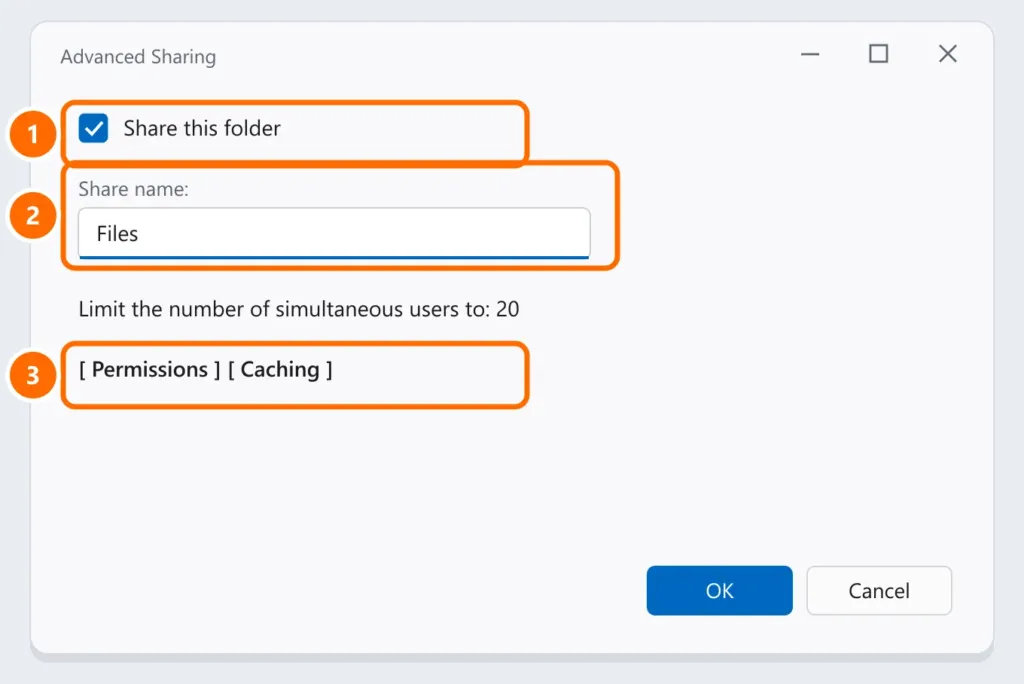
- Click Advanced Sharing and check Share this folder.
- Use a short name with no spaces or accents (for example,
Files). - Click Permissions and set who can access it (step 3).
Step 3: permissions — who reads and who changes
- By default, Everyone gets only Read.
- To allow saving and deleting files, add the users (or keep Everyone) and check Change.
- Avoid Full Control for regular users: it lets them change the permissions themselves.
Step 4: reach it from other computers
On the other computer, type \\PC-NAME\Files in File Explorer’s address bar (the name is under Settings › System › About) or \\PC-IP\Files. To keep the folder handy as Z:, see how to map a network drive.
It asks for a username and password
For security, Windows 11 requires a username and password from the sharing computer. The recommended way:
- On the sharing computer, create a local user (for example,
share) with a password, under Settings › Accounts › Other users. - Give that user permission in step 3.
- On the other computers, sign in as
PC-NAME\shareand check Remember my credentials.
FAQ
The folder shows up, but it says I don’t have permission.
Check both permission layers (step 3) and whether you signed in with the right user.
Does it work between Windows and Mac?
Yes. On a Mac, use Finder › Go › Connect to Server and type smb://PC-IP/Files.
Is this enough for a business?
For a few computers, yes. With more users, a NAS or SharePoint/OneDrive offers better backup, access control and version history.